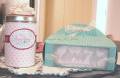
I decorated some pre-existing containers for some token Christmas gifts for our new physics friends in Texas. Very straightforward and relatively quick, except for the part where I was stumped for two weeks on how exactly I wanted them to look. Most folks are leaving town this weekend so that was my impetus for actually getting these started and finished.
The tin on the left formerly held tea. I measured the height of the label that was already on the tin, and cut a 9" length of patterned paper from Walmart just slightly longer so it would cover the old label completely. After some trial and error, the best way to wrap a tin with paper is to put adhesive on one end, wrap the unsticky parts of the paper most of the way around the tin so it is all straight, THEN stick down the sticky end. I used a combo of miracle tape and glue dots to hold the two ends of the paper down. I stamped the white cardstock with my sentiment, then cut the medallion using the Coluzzle oval and oval companion templates. Wrapped some snazzy Michaels dollar spot snowflake ribbon partially around the tin, covered the bare spot between the ends with the oval medallion, cut some red and white cardstock circles to cover the old label, and adhered a regular gift bow on top.
The box on the right was recycled from a previous chocolately gift from my DH. The box and its liner were already made for me, and I just added the wise men image and replaced the bow on top. I inked up the wise men stamp in Weathered Wood, stamped off, then stamped this image. Outlined the image in silver pencil to define the image a little more, and carefully tore the image out in a rectangle shape using the tearing ruler by Plaid. Sponged more Weathered Wood around the edges, and used glue dots to attach the image to the corrugated box. I tied an ivory sheer iridescent ribbon through the lid to hold it closed and the image needed a little more oomph, so I added the two strips of the same ribbon on either side of the image. I only had a 1/16" punch that would reach that far into the box, so I punched my holes using that then broadened them with my embossing stylus.
Just a note that the ends of the ovals liked to pop up even using Glue Dots; the solution I found for this was to use three glue dots on each end of the oval.
I also made some of those cute simple star ornaments for these gifts and looped them through the bow as an accent. The star hangs from the bow on the tin on the left, but because it didn't really 'go' with the box I just tucked the star ornament inside. The boxes are filled with multi-flavours of Hershey's kisses, btw.
Thanks for looking!!
Date: Friday, December 15, 2006 GMT Views: 1079
Favorited:5